The post To audio or not to audio? appeared first on Veronica B.
]]>This week’s ELH challenge is about teaching one or more of the multimedia learning principles. Immediately I remembered something somewhat related that I read a while ago…
To audio or not to audio?
A long time ago I read a great post by Cathy Moore on whether audio narration should be used in corporate e-learning. She was of the general opinion that audio narration was not necessary in asynchronous corporate e-learning. Several studies even backed up the notion that text and learner control were best. Now, for full details go and read her article and the excellent discussion that follows.

For this post though, the thing that stuck with me (remember, I read this a while ago!) was that reading is (generally) quicker than listening to someone read (especially if you have no control over audio speed). I did not know that.
Additionally, you can easily skim through text if it’s a familiar topic and focus only on the parts that are less familiar. However, you cannot easily skim through audio, or you just might miss the one thing you didn’t know and actually needed to listen to.
My (sort of) chosen principle
So even though this is not specifically one of the principles, it’s related slightly to the redundancy principle but might also break the modality principle… c’est la vie. The main point of my interaction is… well… just check it out for yourself by clicking Play below:


The post To audio or not to audio? appeared first on Veronica B.
]]>The post Freeform Drag and Drop in Storyline2 appeared first on Veronica B.
]]>In Storyline, you can build a freeform drag and drop interaction or quiz question in minutes. ‘Freeform’ simply means that any objects on your screen can become a draggable item or a drop target (with a few exceptions, for example video files).
So, if you have a great looking slide and you want to ‘convert’ it into a drag and drop interaction, you can! Simply click the ‘Convert to freeform’ button under the ‘Insert’ tab, and you’re away! If you have a PowerPoint slide you would like to convert, simply import it into your Storyline project and follow the same procedure.
Video tutorial
If you need to see it to believe it, I created a video showing the basics of creating a freeform drag and drop interaction in Storyline and also some customisation tips to make your interaction look and work exactly how you intended.
Was this useful? Please leave a comment below as well as any suggestions for future tutorials.
The post Freeform Drag and Drop in Storyline2 appeared first on Veronica B.
]]>The post PowerPoint Tip 1: Merging shapes appeared first on Veronica B.
]]>I was so excited this week when Dave Anderson, e-learning challenger extraordinaire, started a new series on PowerPoint tips. The task is for the community to create and share screencasts showing different PowerPoint features, techniques, tips, from beginner to advanced.
Merging shapes in PowerPoint
For my first tip I chose to record a video on how to merge shapes in PowerPoint. I learned how to do this years ago now from Tom Kuhlmann. Come to think of it, I learned a lot of PowerPoint techniques from Tom.
PowerPoint comes with a bunch of shapes you can insert and use in your presentations or e-learning course, and most of the time these are sufficient to create the graphics you need. But sometimes you need something a bit more customised and this is where merging shapes comes into play.
PowerPoint has five ‘merge shape’ tools: combine, union, fragment, intersect and subtract.

- Combine: Merges the shapes, but leaves out the intersection area
- Union: Merges the shapes into one shape that covers the entire area of the original objects.
- Fragment: ‘fragments’ the shapes into the individual overlapping shapes
- Intersect: Leaves only the intersection where the selected shapes overlap.
- Subtract: Cuts out the area of the last selected shapes from the first selected one. [Source: http://www.shapechef.com/blog/how-to-merge-combine-shapes-in-powerpoint-2010]
I made a video to show you the basics of these tools, but it’s certainly worth having a go and trying different things. Like with many things, the more you practise, the better, and more creative, you’ll get.
Let me know in the comments if you found this useful or if you have any questions. Suggestions for future PowerPoint tips are most welcome!
The post PowerPoint Tip 1: Merging shapes appeared first on Veronica B.
]]>The post Pantone Color of the Year – DEMO appeared first on Veronica B.
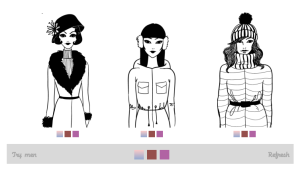
]]>For a while now I’ve been wanting to use a set of characters I found online, and finally found the perfect opportunity through the e-learning heroes Pantone Color of the Year challenge. I like these avatars because they look clean and classy, see for yourself:

The Idea
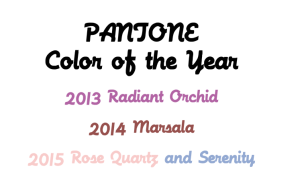
Realising there had a Pantone e-learning challenge for the last three years, I decided to create an interaction using all three Pantone winners: 2014 Radiant Orchid, 2015 Marsala and 2016 Rose Quartz and Serenity. Seeing as my avatars were so fashionably dressed, I wanted the user to be able to change the colour of their clothes to the Pantone colours in question.
The thing is, I only had these images in PNG format. Lucky for me, they had a transparent background, so I used a very simple yet effective technique. I inserted my avatars into PowerPoint, and for each one I used the INSERT > SHAPE > FREEFORM tool to trace the shape of their clothes. Then, I changed the colour of the shape to the relevant Pantone colour, sent it to the back and voila!
Here is a two-minute video on how I did this:
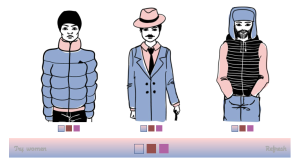
I created one slide for the men and one for the women and then added a set of buttons for each avatar that would change the state of the avatar to the appropriate colour on click or tap. I also added a bar at the bottom of the screen with its own set of ‘colour-changing’ buttons. Lastly, I added a ‘Refresh’ button so the user could set the screen to black and white and start again if desired.
The Result
To finish this off, I added some of my favourite classical pieces from Tchaikovsky, just because it sounds beautiful.
So, click Play below to check it out:
The post Pantone Color of the Year – DEMO appeared first on Veronica B.
]]>The post Video: Dress Your Teddy in Storyline 2 appeared first on Veronica B.
]]>This is the last part in this series, phew! If you missed the previous 3 parts, you can find links to those at the bottom of this post. Here, I’ll show you how I told Storyline to show the appropriately-dressed teddy based on the learner’s choice.
So, if you’re looking for a quick demo on how to build a simple but snazzy interaction in Storyline 2 using state changes (and much more!) then you’re in the right place.
If you’re looking for a bird, remember that one on your hand is probably easier to eat than one in someone else’s bush.
The live demo
If you haven’t seen it yet, click Play to see the live demo.
The video
This last part is quite simple:
1. Create states for the teddy. In my case, I needed 8 states for my teddy.
2. Create triggers to change to the correct teddy state when the learner clicks ‘check’.
Here’s the video on how to do it:
Hope you enjoyed this video series on how to create this cute interaction. Leave me a comment below if you have any questions!
This is my fourth post that describes the construction of Adjectival Teddy. It’s a simple concept and a short game, but it’s good to explain how the core functions of Storyline 2 can be combined effectively.
If you missed the previous two posts, you can still see them:
- PART 1—VIDEO: Motion Paths, Storyline 2 & Adjectival Teddy
- PART 2—VIDEO: Object States, Storyline 2 & Adjectival Teddy
- PART 3—VIDEO: Storyline 2 Variables, Combinations and Adjectival Teddy
The post Video: Dress Your Teddy in Storyline 2 appeared first on Veronica B.
]]>The post VIDEO: Storyline 2 Variables, Combinations and Adjectival Teddy appeared first on Veronica B.
]]>So, if you’re looking for a quick demo on how to use variables to show feedback in a drag-and-drop interaction, you’re in the right place. If you’re looking for Mr Funny Kebab, then you might have been in the right place a few years ago, but that shop is well-shut now.
The demo is based around a small interaction I built a little while back, where different adjectives describe the design of a teddy bear. In the demo, the feedback function is actually pretty complex because there is not one single correct answer: There are multiple user-actions that could be right. As such, the Storyline 2 variables need not only be defined but also combined to make the feedback say the right thing.
And here is the video tutorial:
Hope that’s useful, let me know in the comments below.
This is my third post that describes the construction of Adjectival Teddy. It’s a simple concept and a short game, but it’s good to explain how the core functions of Storyline 2 can be combined effectively.
If you missed the previous two posts, you can still see them:
- PART 1—VIDEO: Motion Paths, Storyline 2 & Adjectival Teddy
- PART 2—VIDEO: Object States, Storyline 2 & Adjectival Teddy
To see a live demo, click Play below.
Heck, if you put together all the how-to videos, you can build your own demo. If you do, be sure to let me know—I’d be happy to post a link to it.
Related articles across the web


The post VIDEO: Storyline 2 Variables, Combinations and Adjectival Teddy appeared first on Veronica B.
]]>The post VIDEO: Object States, Storyline 2 & Adjectival Teddy appeared first on Veronica B.
]]>Object states define the different ways that a thing can appear in your Storyline 2 interaction. For example, you can set the base state of an object, defining its colour, size and position.
Other software use object states too, but Storyline 2 makes it all pretty simple. So simple, in fact, that I can show you all the basics in a single post.
So, if you’re after a quick lesson on how to use object states while building a simple but snazzy animation in Storyline 2, then you’re in the right place. If you’re looking for a free lunch, let me know if you find it.
Demo that uses object states
As in my previous video on how to use motion paths, I’ll be showing how I use object states by referring to the demo Adjectival Teddy: The Game. If you want a quick squiz at that demo before you look at today’s how to video, click the Play button below.
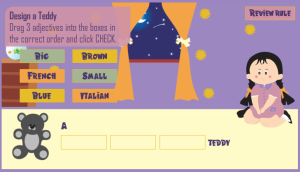
In case you still have not read the earlier post about that demo, it was a simple game created in response to Dave Anderson’s challenge to create E-learning Games to Improve Punctuation and Grammar. Adjectival Teddy: The Game uses a selection of Storyline 2’s functions—including object states—to change the way things look on the screen
Video to help you use them too
And so it is, that in this—the second video of the Adjectival Teddy: How To series—I’m gonna show you how to use object states to get the CHECK button to appear once the user has filled in all three target fields.
Hey, if you watched this video and the one about motion paths, you must be nearly ready to make your own Adjectival Teddy game. When I get a spare moment, I’ll give you the next tip in the series: something to do with variables.
Related articles across the web


The post VIDEO: Object States, Storyline 2 & Adjectival Teddy appeared first on Veronica B.
]]>The post Emoji Game: The Mood-o-Meter appeared first on Veronica B.
]]>Now, I am cooler than all that. How cool, you ask? So cool that I used this e-learning heroes challenge to shoehorn emojis into an online interaction.
Concept: Use emojis
These days, there is an emoji for just about anything. The original idea, however, was to give a visual indication of emotions. The name comes from the latin ’emo-‘ and ‘-ohjee’. ’emo-‘ was what the Ancient Romans called teenagers who wore too much black and who felt their feelings more deeply than other people feel their feelings. ‘-ohjee’ was what parents often said after being told that their emo child had transformed into a cartoonish image . Probably. Or maybe not. Okay, I’ll admit it: I don’t know the etymology of the word emoji.
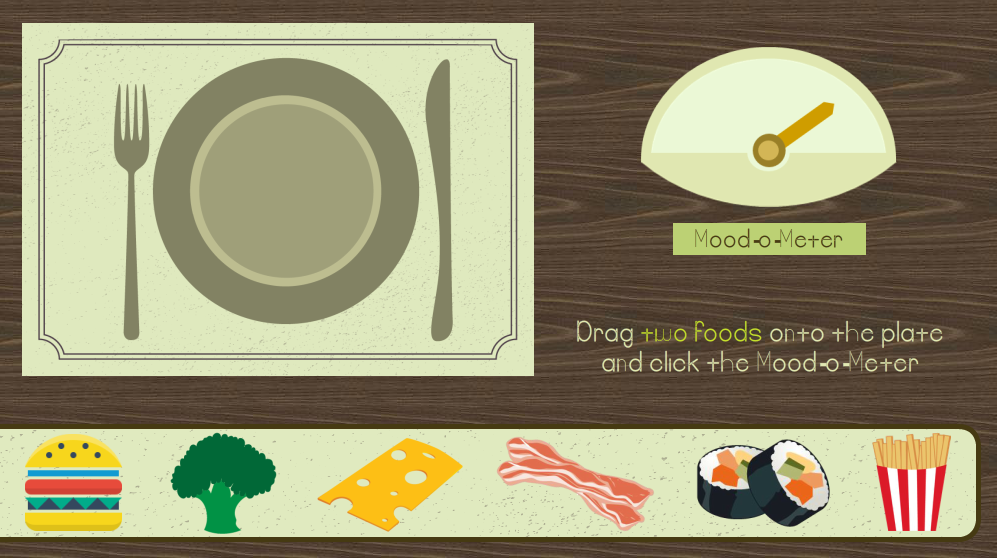
All of that aside, I decided it would be cool to create a virtual Mood-o-Meter. Because I’m currently believing that emojis are cool, my Mood-o-Meter would use different emojis to indicate the various moods it encounters.
But I didn’t want to just randomly guess at the mood of my users. That would be boring. I needed a way of predicting their mood…
Despite my repeated prayers, I presently lack the magics to actually peer out of a computer monitor and see the colour of the souls of e-learning users. So, I decided to make a super-simple game because games are much less boring. As a basis of the game, I needed something that could affect mood…
Food! Food is something that can affect a mood. It sure affects mine. What is more, food rhymes with mood, which must have been fate telling me something.
So, after fate told me to make a game about foods and moods so that I could justify using emojis on screen, I realised that was also going to make me design an interaction.
Interaction: Food maketh the mood
Using a drag-and-drop interaction, the learner is asked to select two food items they want. Then, drag the food items onto their plate and turn their attention to the ‘Mood-o-Meter’. As if through steampunk wizardry, the Mood-o-Meter whizzes and churns to analyse the learner’s selections. After it’s complete, the Mood-o-Meter outputs an emoji-based indication of how the user would feel after eating their meal. It can be tried repeatedly, as the Mood-o-Meter resets each time.

Graphical Design
The Mood-o-Meter is a quickly composed example, so it’s not exactly an artistic masterpiece. I found some of the pictures in my image library. The emojis were part of an image set that I’ve had for a while. Others pictures, I borrowed from Pixabay. I created the Mood-o-Meter image myself.
The food items were largely selected as the first ones at hand.
The wooden background is meant to simulate a table. I also added a nice placemat and plate, ’cause we’re not animals.

Oh, you would like to try it? Go on then. Click Play:
Disclaimer: This is not nutritional advice. Nothing about it is to be taken seriously. Except, of course, for the uber-serious way that it shows how we can use rapid-development tools to create unique multimedia interactions.
I can’t actually guarantee that eating broccoli with sushi will make you feel super happy. Maybe your emoji will be frowny. Maybe the broccoli is over cooked. Or the sushi might be that too-chewy eel stuff. Then what? THEN WHAT? 
The post Emoji Game: The Mood-o-Meter appeared first on Veronica B.
]]>The post VIDEO: Motion Paths, Storyline 2 & Adjectival Teddy appeared first on Veronica B.
]]>Motion paths are an easy way to define movement patterns in Storyline 2. They may sound complex, but the software does most of the grunt work for you. What you get is a user-friendly way to rapidly develop some impressive animations. They were one of the simple methods I applied to quickly create the Adjectival Teddy game that I shared in an earlier post. Back then, I said I might show you how the game was put together. I guess now is the time that ‘might’ happens.
So, if you’re looking for a quick demo on how to build a simple but snazzy animation in Storyline 2 using motion paths, you’ve stumbled into the right place.
If you’re looking for a rabbit-hole, then maybe you should be following that furry white guy with the fob watch. You can’t miss him. I mean, how many fob watches do you see these days?
Motion paths maketh the game demo
In the video, I refer to the demo Adjectival Teddy: The Game. In case you’d like a quick squiz at it before you look at the how to video, click the Play button below.
In case you missed the earlier post about it, the game was created in response to Dave Anderson’s challenge E-learning Games to Improve Punctuation and Grammar. It uses Storyline’s motion paths and its drag-and-drop capabilities and it’s got quite a few different states and variables.
Show me the video
So, in this video I’m gonna show how motion paths create the animation on the first screen of Adjectival Teddy.
What’s next?
Now you know how motion paths were used in Adjectival Teddy. You might be wondering what else it took to make that little game. Well, it’s all pretty straightforward. I’ll show you exactly how straightforward in my next couple of posts. We’re yet to chat about object states, variables and the like. So, come back now, ya hear.
Was that helpful? Did you catch up with the white rabbit? Any questions? Let me know in the comments section, below.
Related articles across the web


The post VIDEO: Motion Paths, Storyline 2 & Adjectival Teddy appeared first on Veronica B.
]]>The post VIDEO: How to Develop a Customised Progress Bar appeared first on Veronica B.
]]>
What’s in the progress bar video?
The video below shows you how to:
- Create the different states for the bar
- Create the variables you’ll need to make it work
- Set the triggers to make it all happen.
There it is. Whether you want to call it a progress meter, a bar or a cocktail lounge, its all about states, variables and triggers. Simples!
Free download!
If you’d like to see how this was built, download the source file below (Storyline 2 file):

The post VIDEO: How to Develop a Customised Progress Bar appeared first on Veronica B.
]]>